Kamado Joe Built-In & Table Dimensions + Cutout Guide
Frequently Bought Together
Kamado Joe Built-In & Table Dimensions + Cutout Guide
For 20 years, we’ve helped grillers get the most out of their ceramic grills with racks and accessories that fit right and built to last. Whether you're a seasoned pro or just getting started — if you have questions about fit, features, or what you really need, we're here to help
-
Have a Question? Give us a call
Whether you have questions about fit, compatibility, or just want a recommendation, we’re here to help - and yes, you’ll talk to a real person who knows a thing or two about kamado grills.
📞 Call us at 940-387-0100, or 📬 send us a message.
-
Fast, Reliable Shipping
Most orders ship out same or next business day. And, shipping’s on us for orders over $99.
Live in the DFW metroplex? Swing by and pick it up in-store — we’ll have it ready. Our retail store is located in Denton.
📌 Get directions -
Tips & Resources
New to kamado cooking or just looking to up your BBQ game? Our guides, gear breakdowns, and how-tos will help you get the most out of your setup.
Check out the Pitmaster's Playbook
Product Description
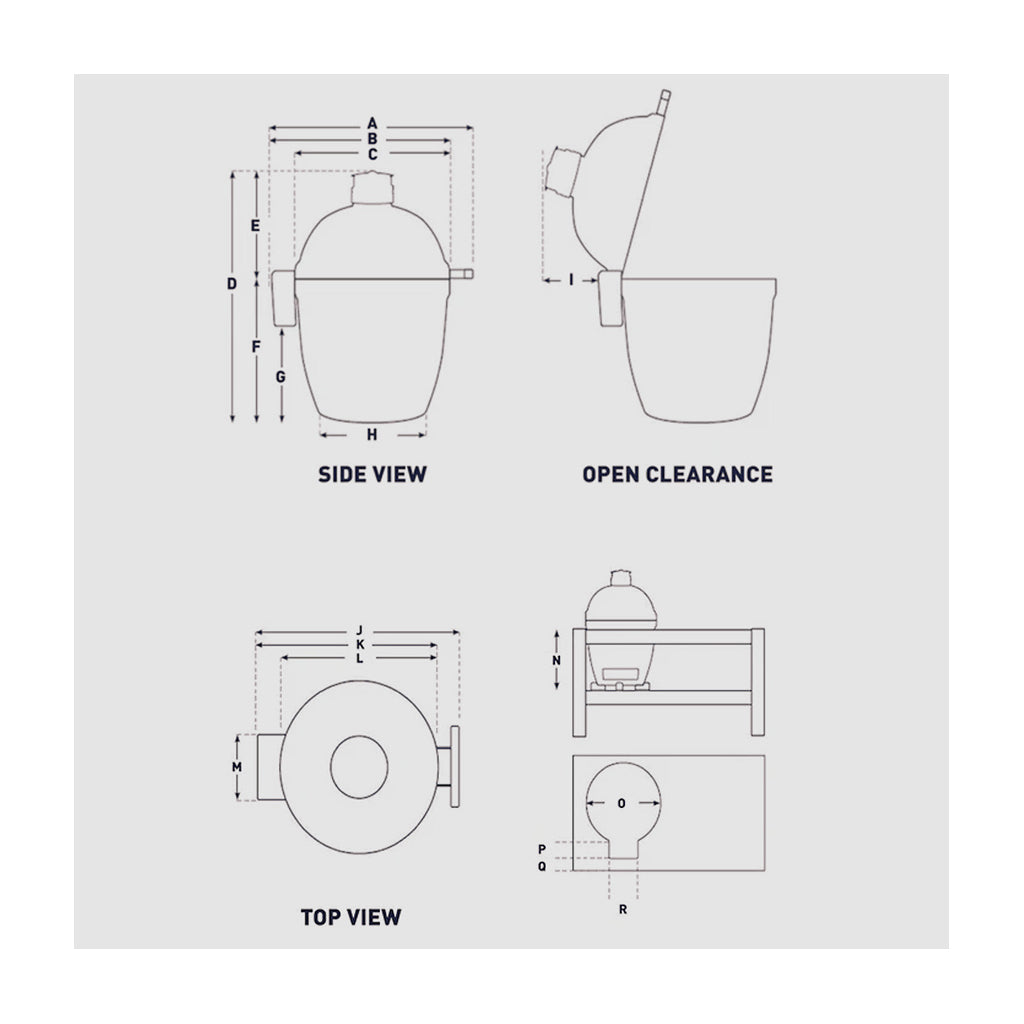
The Kamado Joe built-in dimensions below help you plan an outdoor kitchen, grill table, or custom installation for Classic Joe, Big Joe, and Konnected Joe models. Use the A–R diagram with the chart to confirm cutout size, hinge clearance, latch clearance, and overall grill height before cutting stone, cabinetry, or countertop material.
Built-In Dimensions by Model
Start with the diagram, then match each measurement to the chart below. All measurements are shown in inches.

Reference diagram for A–R measurements used in the table below.
| Measurement | Konnected Joe | Classic Joe II | Classic Joe III | Big Joe Konnected | Big Joe II | Big Joe III |
|---|---|---|---|---|---|---|
| Model # | KJ15041123 | KJ23NHRC | KJ15040721 | KJ15042425 | BJ24NRHC | KJ15040821 |
| A - Hinge to handle | 30.3" | 30.3" | 30.3" | 35.6" | 35.6" | 35.6" |
| B - Hinge to dome | 26.9" | 26.9" | 26.9" | 31.8" | 31.8" | 31.8" |
| C - Dome width | 22.3" | 22.3" | 22.3" | 27.6" | 27.6" | 27.6" |
| D - Base to top vent | 31.2" | 31.2" | 34.1" | 35.3" | 35.3" | 38.5" |
| E - Dome height | 14.3" | 14.3" | 14.3" | 15.2" | 15.2" | 15.2" |
| F - Base height | 16.9" | 16.9" | 19.8" | 20.1" | 20.1" | 23.3" |
| G - Base to hinge bottom | 8.6" | 8.6" | 11.5" | 11.3" | 11.3" | 14.5" |
| H - Base width | 17.0" | 17.0" | 17.0" | 21.5" | 21.5" | 21.5" |
| I - Open clearance | 1.6" | 1.6" | 1.6" | 3.6" | 3.6" | 3.6" |
| J - Hinge to handle | 30.3" | 30.3" | 30.3" | 35.6" | 35.6" | 35.6" |
| K - Hinge to dome | 26.9" | 26.9" | 26.9" | 31.8" | 31.8" | 31.8" |
| L - Dome width | 22.3" | 22.3" | 22.3" | 27.6" | 27.6" | 27.6" |
| M - Hinge width | 7.8" | 7.8" | 7.8" | 11.7" | 11.7" | 11.7" |
| N - Feet to counter | 14.4" | 14.4" | 17.3" | 17.6" | 17.6" | 20.8" |
| O - Cutout diameter | 22.8" | 22.8" | 22.8" | 28.1" | 28.1" | 28.1" |
| P - Latch depth | 4.7" | 4.7" | 4.7" | 5.2" | 5.2" | 5.2" |
| Q - Latch to edge | 3.6" | 3.6" | 3.6" | 5.6" | 5.6" | 5.6" |
| R - Latch width | 9.3" | 9.3" | 9.3" | 13.2" | 13.2" | 13.2" |
Counter Cutout & Clearance Notes
- Cutout: Use "O" for the main opening
- Latch: Use P, Q, R for front clearance
- Hinge: Use A, B, I for rear clearance
- Height: Use F as your primary reference
Built-In Installation Guidelines
Always confirm measurements before cutting. Use non-flammable materials, allow airflow underneath, and do not trap the grill in a sealed cabinet.
Key Things to Consider:
Before building your outdoor kitchen or table, review these key considerations. They will help you avoid common mistakes and ensure proper fit, clearance, and long-term durability.
Outdoor Kitchen Build:
- Keep the front open: Do not build a fixed countertop in front of the grill. You need clearance for the lid and latch—front ledges often crack over time.
- Plan for lid opening: Account for depth when the grill is open—especially if there is a wall or backsplash behind it. Reference "I" in the chart (measured from the hinge).
- Short on depth? It’s okay if the grill sits slightly forward and extends past the front of the masonry. Just make sure the front feet are fully supported on the ledge.
- Account for the feet: The grill feet are approximately 1" tall and must be included when setting final height.
- Use "F" as your baseline: Measurement "F" (top of base) is the key reference for setting grill height—similar to kitchen countertop or stove height.
- Set proper height: At minimum, align the top of the base (F) with the countertop. Many prefer it slightly above for easier access.
Table Build:
- Set working height first: Position the top of the base at a comfortable cooking height—similar to your kitchen.
- Lower the table surface: The table top should sit a few inches below the base height to allow access to the front latch.
- Build around the grill: Use a cutout design, as shown in the diagram, so the table surrounds the grill—this adds strength and stability.
- Plan for wheels early: If using casters, select them before building and include their height in your measurements.
- Use locking casters: Two locking wheels on the front side are recommended for stability.
- Allow side space: Make sure there’s enough room on both sides of the grill for your largest cookware and tools.
- Do not place directly on flammable surfaces: Always account for the grill feet and use proper materials underneath.
- Think about a cover: If you plan to use a table cover, factor that into your final dimensions. Shop covers early in the process.
- Need ideas? Search for Kamado table plans online—there are plenty of proven designs.
- Real-world build: Expect the project to take longer and cost more than planned—most builds do. Give yourself extra time and budget from the start.